
Ice Cube Tray for Tumbler, 3 Pcs Silicone Hollow Cylinder Ice Mold with Lid and Bin for Freezer, Ice Drink, Juice, Whiskey, Cocktail, Compatible with 40Oz Tumbler (Green)
$19.99 (as of April 17, 2024 20:57 GMT +00:00 - More infoProduct prices and availability are accurate as of the date/time indicated and are subject to change. Any price and availability information displayed on [relevant Amazon Site(s), as applicable] at the time of purchase will apply to the purchase of this product.)Power cords are just as necessary as the device in the issue. A power cord is essential for operating any device, whether a smart TV or powerful industrial equipment. Power generators are no different.
You must have the cord for your power generator ready if you intend to use one. When at home, you can position your generator close to the source of electricity, perhaps eliminating the need for extension cables.
However, an extension cord is necessary to use your electricity generator outdoors.
The extension cable is a common item, and you can quickly get some excellent 30-amp extension cords at all big web retailers that deal with electric appliances and generators. However, you can construct your unique 30-amp extension cord if you are unsure where to purchase one. It is a straightforward procedure that you may systematically use to complete your assignment; nevertheless, it is not highly strict and necessitates having some technical expertise.
Let’s immediately set out for the operation to learn how to create a 30-amp generator extension cord.
Step 1
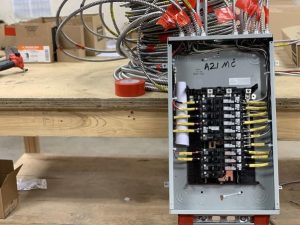
Choose a cord with suitable properties. Electrical cords must be rated for indoor or outdoor use, temperature range, and maximum load capacity. To power a six-kilowatt heater from a 240-volt generator parked 30 feet from the house in a snowy area, for example, you’ll need at least a 30-amp extension cord built for winter use and with a wire gauge large enough to handle the heater’s demands.
Step 2
Determine the maximum current that your appliances will use from the generator. Every appliance should have an information plate displaying kilowatts (kW) load. Divide the voltage by the load in watts. For example, with a 240-volt supply and a six-kilowatt load, the current required is 6000 / 240, or 25 amps.
Step 3
Disassemble the plugs that will be connected to the cord. Insert a few feet of cord through the housings of both plugs. This allows you to prepare the cord ends without the plug housings getting in the way.
Step 4
Place each plug base so that the end of the cord is flush with the terminals. Take note of where the cable grab is, then cut the outer insulation from the cord slightly past the cable grip with a knife. Leave the insulation where the cable grip will hold the cord but expose the interior wires. Trim the wire ends so they don’t pull or bunch up when they reach the connections.
Step 5
Remove the insulation to expose the final quarter-inch of each wire. Twist the exposed wire filaments within each wire together to strengthen the ends.
Step 6
Join the wires to the appropriate plug terminals. All generator cords must be polarized; thus, using the proper terminals is critical. Connect the “hot” black or red wire to the brass termination. Connect the silver terminal to the white “neutral” wire. A bare or green-covered grounding wire must also be installed and connected to the GND terminal. The terminal could also be green.
Step 7

Fasten the cord firmly in the grips to prevent it from being yanked away from the plugs. Check that the connections are secure and that no wires are caught or lying in places where the plug top will crush them. On each plug, replace the top housing. The cord is finally finished.
Tips to Use Extension Cords Safely
Don’t Use Indoor Extension Cords Outside
Outdoor extension cords are made of far more durable materials than indoor cords. This is required to protect the cord from dampness, oil and chemical spills, and other potentially harmful external conditions. Because they frequently need to transport current over a longer distance, most outdoor extension cords are also manufactured with bigger gauge wire.
These essential distinctions demonstrate why it is acceptable to use an outdoor extension cord indoors but not an interior extension cord outside. Examine the package of any extension cord you purchase carefully to learn the manufacturer’s guidelines for proper cable use.
Inspect Extension Cords Regularly
Even if you follow every advice for securely using extension cords, there is no replacement for frequently inspecting them before using them. To do so, you must be able to recognize the symptoms of a damaged cord.
Check for exposed wiring on either end of the cord near the plugs; this damage is typical when extension cords are pulled out of a socket. Next, inspect the length of the cord for nicks, crimps, or melted insulation parts.
Never Chain Extension Cords Together
Chaining extension cables together creates a slew of new issues and should be avoided at all costs. Chaining extension cords pose a considerable risk since the resistance of the series of cables grows as the length increases, generating more heat and creating a fire hazard.
How to Determine the Capacity of an Extension Cord?

Knowing the wire gauge of an extension cable allows you to determine its capacity quickly. The thickness of the wire dictates how much current or wattage it may safely carry.
To put it another way, the larger the cable, the more electrical it can carry. The gauge of the wire can be easily determined by looking for a printed AWG marking on its insulation.
Can I Connect Power Strip or Regular Extension Cord Directly to Generator?
Most portable generators now offer 15 amp 120-volt outlets, connecting them to a standard power strip. Check that the devices you need to connect do not have a power output that exceeds the generator outlet ratings.
Bottomline
You may save money by learning how to create a 30-amp generator extension cord. Furthermore, you may be sure that your custom-built power cord is of superior quality to those on the market. Do you believe you can create a 220-volt 30-amp extension cord now that you have the instructions? Significantly, remember always to observe safety regulations while makin
USANOOKS Microfiber Cleaning Cloth Grey - 12 Packs 12.5"x12.5" - High Performance - 1200 Washes, Ultra Absorbent Towels Weave Grime & Liquid for Streak-Free Mirror Shine - Car Washing Cloth
$9.99 (as of April 17, 2024 20:57 GMT +00:00 - More infoProduct prices and availability are accurate as of the date/time indicated and are subject to change. Any price and availability information displayed on [relevant Amazon Site(s), as applicable] at the time of purchase will apply to the purchase of this product.)